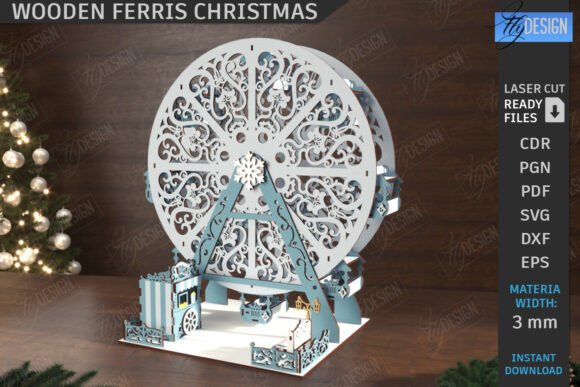
Crafting Holiday Magic with a Wooden Ferris Wheel Model
The holiday season often calls for decorations that feel personal, handmade, and distinct from the mass-produced items found in big-box stores. For makers, crafters, and small business owners, the opportunity to create something unique is where the real joy of Christmas lies. One design that has captured the imagination of the laser cutting community is the Wooden Ferris Wheel Model Laser Cut Xmas. This charming project combines the nostalgia of amusement parks with the cozy warmth of winter decor, resulting in a piece that serves as both a delightful toy and a sophisticated shelf sitter.
Whether you are looking to expand your product line for the holidays or simply want to build a special gift for a family member, understanding the nuances of this project is essential. The appeal of a mini ferris wheel ornament or a larger home decor piece lies in its movement and intricate geometry. When crafted from wood, the natural grain adds a rustic elegance that plastic simply cannot replicate. This guide explores how to bring this 3D model to life, the technical considerations for laser cutting, and why this specific design fits perfectly into modern crafting workflows.
The Appeal of 3D Wooden Puzzles in Modern Decor
In an era dominated by digital screens and virtual experiences, there is a growing appreciation for tactile, physical objects. A Wooden Ferris Wheel Model Laser Cut Merry Christmas decoration taps directly into this desire for tangible interaction. Unlike static ornaments that hang limp on a tree, a ferris wheel implies motion. Even if the wheel is not motorized, the design invites the viewer to spin it manually, creating a moment of engagement.
These models serve multiple purposes depending on their scale. As a Christmas ornament, a mini version adds a whimsical touch to the tree, standing out among traditional baubles. As a shelf sitter, a larger model becomes a centerpiece for a mantel or bookcase, evoking memories of winter carnivals and family outings. For families, assembling the puzzle itself becomes a holiday activity. It bridges the gap between generations; grandparents can help grandchildren slot pieces together, fostering connection while creating a lasting keepsake.
The versatility of the design allows it to fit various themes. While inherently festive when adorned with red and green accents or snowflake patterns, the clean lines of the wooden structure also work well in minimalist or Scandinavian-style homes. The "Winter Pattern" aspects often included in these designs add just enough seasonal flair without overwhelming the aesthetic.
Technical Precision: Understanding Cut and Engrave Lines
Success with any laser cutting project hinges on file preparation. The Wooden Ferris Wheel Model Laser Cut files provided in digital archives are typically meticulously organized to ensure the machine knows exactly what to do. A standard best practice, which you will find in high-quality downloads, involves color-coding the vector lines. Usually, RED lines indicate CUT paths, telling the laser to slice completely through the material. Conversely, BLACK lines indicate ENGRAVE paths, where the laser merely marks the surface to add detail, texture, or instructions.
Adhering to this color convention is critical. If your software misinterprets a cut line as an engrave line, the pieces will not separate, rendering the assembly impossible. Conversely, if an engrave line is set to cut, you might lose delicate details or weaken the structural integrity of the joints. Before sending any job to your machine, always perform a preview simulation in your software. This simple step can save valuable material and time.
Furthermore, the complexity of a ferris wheel requires precise kerf compensation. The "kerf" is the width of material removed by the laser beam. In a puzzle with many interlocking tabs and slots, failing to account for kerf can result in a wheel that is either too loose and wobbly or too tight to assemble. Experienced operators often run test cuts on scrap pieces of the same wood thickness to dial in these settings before committing to the final project.
Navigating File Formats and Software Compatibility
When downloading a digital product for a project like this, you will typically receive a zip archive containing a variety of file formats: SVG, EPS, PNG, PDF, and DXF. Each format serves a specific purpose and compatibility need across different software ecosystems.
- SVG (Scalable Vector Graphics): Widely supported by web-based tools and some desktop software. It is great for scaling without losing quality but can sometimes behave unpredictably in industrial laser software.
- DXF (Drawing Exchange Format): Often the preferred choice for professional laser cutting software like LightBurn. It tends to preserve dimensions more accurately.
- EPS and PDF: Excellent for graphic design programs like Adobe Illustrator or CorelDRAW, allowing for easy editing of colors and line weights before exporting to a machine-ready format.
- PNG: A raster image useful for previewing the design or for use with diode lasers that rely on image processing, though less ideal for precise vector cutting.
A crucial consideration for users of LightBurn, one of the most popular laser control software platforms, is file distortion. It is a known observation that LightBurn can sometimes distort the dimensions of files, particularly when importing SVG formats. This scaling issue can be disastrous for a puzzle that relies on precise measurements to fit together. If you are working with LightBurn, it is highly recommended to use the DXF file format instead. DXF files generally import with true-to-scale dimensions, ensuring that your Wooden Ferris Wheel Model assemblies fit together seamlessly without gaps or forced joints.
If you find yourself in a situation where the provided files do not match your specific workflow, many creators are open to communication. Reaching out to request a different file type or a specific color variation of a PNG can often resolve compatibility hurdles before they become problems.
Material Selection and Assembly Tips
The choice of material dramatically affects the final look and durability of your Christmas decorations. Plywood, specifically birch or bamboo, is a favorite among laser cutters for its strength and clean edges. A thickness of 3mm to 4mm is usually ideal for these types of puzzles, providing enough sturdiness for the wheel to spin without being too heavy for the axle.
When assembling the Mini Ferris Wheel Christmas Ornament or larger versions, patience is key. Dry-fit the pieces first without glue to ensure all tabs slide in smoothly. If a joint is too tight, a little sanding on the tab can make a world of difference. Once satisfied with the fit, apply a small amount of wood glue to the joints. Avoid using too much glue, as excess squeeze-out can stain the wood and interfere with the movement of the wheel.
For those intending to sell these items, finishing touches matter. A light coat of clear sealant can protect the wood from moisture and wear, while leaving the natural grain visible. Alternatively, painting the cars of the ferris wheel in bright, festive colors can make the product pop on a marketplace shelf. The "Amusement Park" vibe is enhanced by these colorful details, making the item an attractive gift for kids and collectors alike.
Integrating into Your Creative Workflow
For small business owners, the Wooden Ferris Wheel Model Laser Cut Xmas represents a scalable product. Because the design is digital, you can produce inventory on demand, reducing waste and storage costs. The ability to quickly switch between cutting ornaments and larger shelf sitters allows you to cater to different price points and customer needs during the busy holiday rush.
Moreover, these projects encourage community engagement. Sharing photos of your builds, discussing file tweaks, or showcasing how you finished your pieces can help you grow a following. Many creators invite customers to follow their shops to see future releases, building a loyal customer base eager for the next innovative design. Whether you are a hobbyist enjoying a quiet evening of crafting or an entrepreneur scaling up production, the process of bringing this 3D model to life is rewarding.
Ultimately, the goal is to create something that brings joy. A spinning wooden ferris wheel on a windowsill, catching the winter sunlight, or hanging gently on a lit tree, embodies the spirit of the season. It is a reminder of simple pleasures and the beauty of handmade goods. By paying attention to file formats, respecting the cut and engrave distinctions, and choosing the right materials, you ensure that your final product is not just a decoration, but a cherished piece of art.
As you embark on this project, remember that every machine and material batch is slightly different. Testing, adjusting, and refining your approach is part of the fun. If questions arise regarding file compatibility or specific sizing needs, do not hesitate to reach out to the designer. The crafting community thrives on collaboration and support, ensuring that everyone can successfully create their own version of this delightful Winter Pattern 3D Model.