Crafting the Perfect Personalized Golfer Father's Laser Cut Gift
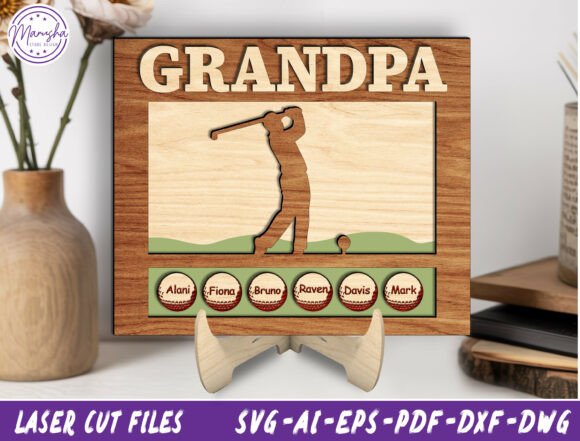
Finding a gift that genuinely resonates with a golf enthusiast, particularly a grandfather who has spent decades perfecting his swing, can feel like searching for a lost ball in the rough. You want something that acknowledges their passion but also celebrates their role in the family. This is where a Personalized Golfer Father's Laser Cut design becomes an invaluable resource. Unlike mass-produced trophies or generic mugs, these layered SVG files allow creators to build a bespoke piece of art that combines sport and sentimentality. However, diving into laser cutting or CNC routing without a clear plan often leads to wasted materials and frustrated hours. To ensure your final project looks professional rather than amateurish, it is essential to understand the nuances of file preparation, material selection, and assembly before you ever hit the "start" button on your machine.
Understanding the Value of Layered Designs
The appeal of a Personalized Golfer Father's Laser Cut lies in its dimensionality. A flat image of a golfer is nice, but a multi-layered scene featuring a dynamic silhouette mid-swing, a stylized green, and a bold header creates depth and visual interest. These designs are specifically engineered for machines like Glowforge, xTool, and Muse, meaning the vectors are already optimized for cutting and engraving. Yet, many beginners make the mistake of assuming that downloading the file is the hard part. In reality, the true challenge—and opportunity—lies in execution. When you choose a design that includes customizable elements, such as golf ball charms for engraving grandchildren's names, you are committing to a higher standard of precision. If the layers do not align perfectly or if the engraving depth is inconsistent, the "one-of-a-kind" promise falls flat.
Common Pitfalls in Material Selection
One of the most frequent errors creators make when working with sports-themed decor is choosing the wrong substrate. While the design file may be perfect, using low-quality plywood or acrylic can ruin the aesthetic. Cheap woods often have voids inside the layers that burn unpredictably, leaving black scorch marks that distract from the clean lines of the golfer silhouette. Furthermore, failing to consider the thickness of your material relative to the design specifications can cause assembly issues. If the slots for the desktop display stand are cut for 3mm wood and you use 4mm, the pieces simply will not fit together without force, which risks cracking the delicate tabs.
To avoid this, always verify the material requirements listed in the file description. High-end results come from high-end inputs. Consider using birch plywood for a light, natural look that takes stain beautifully, or maple for a denser, more premium feel. If you plan to paint specific layers, ensure the wood surface is sanded smooth beforehand. Remember, the goal is to create a vibrant, professional-looking sports scene; starting with rough, uneven materials works directly against that objective.
Navigating Customization and Engraving Settings
The ability to personalize the golf ball charms with names is a standout feature of this design, but it is also where many users stumble. A common misunderstanding is that all engraving settings are universal. What works for cutting the outer shape of a golf ball will likely obliterate the fine details of a name if applied to the same area. Users often rush to engrave names without testing power and speed settings on a scrap piece of the exact same material. This can lead to text that is either too faint to read or burned so deeply that it compromises the structural integrity of the charm.
A better approach is to treat the personalization phase as a separate operation. Isolate the text layers in your design software and adjust the focus height if your machine allows for it, ensuring the laser beam is tightest on the surface where the names will appear. Additionally, think about legibility. Cursive fonts might look elegant, but on a small golf ball charm, a clean sans-serif font often reads better from a distance. Before finalizing the cut, do a dry run or use the camera preview feature on modern lasers to ensure the names are centered within the ball boundaries. Misaligned text looks sloppy and detracts from the thoughtful nature of the gift.
Assembly and Finishing Mistakes
Even with perfect cuts and engraving, the final presentation can be undermined by poor assembly techniques. Many hobbyists skip the dry-fit stage, eager to glue everything together immediately. This is a critical error. Without assembling the layers loosely first, you cannot identify tight joints or misaligned edges that need minor sanding. Forcing pieces together can shift the alignment of the "GRANDPA" header relative to the golfer, throwing off the entire composition.
Furthermore, the choice of adhesive matters. Using a glue that expands as it dries can squeeze out between layers, creating visible bumps that ruin the smooth, stacked look of the 3D design. Instead, use a thin cyanoacrylate (super glue) or a precise wood glue applied sparingly with a toothpick. When it comes to finishing, some creators hesitate to add color, fearing they will mess up the natural wood look. However, the design is intended to be vibrant. Using wood stains on specific layers—perhaps a darker green for the putting surface and a lighter tone for the sky—can enhance the depth. Just remember to apply finishes before final assembly to avoid getting stain on glued joints.
Making the Right Decision for Your Project
Before downloading or purchasing a Personalized Golfer Father's Laser Cut file, take a moment to evaluate your own skill level and equipment capabilities. While these projects are marketed as beginner-friendly, they still require a basic understanding of vector software and machine maintenance. Check if the file includes organized layers; a messy file with ungrouped elements will double your preparation time. Look for descriptions that mention "laser-ready cut and engrave lines," as this indicates the creator has already accounted for kerf (the width of the laser burn), saving you from manual adjustments.
Ultimately, the success of this project depends on patience and attention to detail. Whether you are a small business owner looking to expand your product line with custom gifts or a grandchild wanting to make something special for a birthday, the process should be enjoyable. By avoiding the traps of cheap materials, untested settings, and rushed assembly, you ensure that the final plaque is not just another decoration, but a cherished keepsake. The image of a golfer mid-swing, surrounded by the names of loved ones, becomes a powerful symbol of legacy and love when executed with care. Take the time to do it right, and the result will be a testament to both your craftsmanship and your affection.